Unlock the Secret to Healthier, Flavorful Chicken Lollipops
Craving that satisfying crunch and juicy tenderness of chicken, but want to keep things on the healthier side? Look no further than perfectly baked chicken lollipops. These delightful drumsticks, shaped to resemble a lollipop, are not only a feast for the eyes but also a treat for your taste buds, offering all the flavor without the guilt of deep-frying. Ideal as an impressive appetizer, a fun snack, or a unique main dish, healthier chicken lollipops are surprisingly easy to make and a guaranteed crowd-pleaser for any gathering.
The beauty of the chicken lollipop lies in its presentation and versatility. By baking them, we harness the natural flavors of the chicken, enhanced by a carefully chosen marinade and a crispy, caramelized exterior. Forget complicated techniques; with a few simple steps, you can transform ordinary chicken drumsticks into these culinary masterpieces. Let's dive into how to create these wonderfully tender and delicious treats that are sure to become a staple in your recipe repertoire.
The Art of Frenching: Shaping Your Chicken Lollipops
The distinctive "lollipop" shape is what makes these drumsticks so appealing, and it's achieved through a technique called "Frenching." While it might sound intimidating, Frenching chicken drumsticks is straightforward and significantly elevates the dining experience. It not only makes the chicken easier and cleaner to eat but also ensures even cooking and a beautiful presentation.
Step-by-Step Frenching Guide:
- Prepare Your Workspace: Lay a chicken drumstick on a clean cutting board, bone-side up. Ensure you have a sharp knife, kitchen shears, or sturdy scissors ready.
- Locate the Joint: Identify the knuckle or joint at the thinner end of the drumstick bone, just below the bulk of the meat. This is where you'll make your initial cut.
- Make the Incision: Using your knife or shears, cut around the circumference of the bone just below the meaty portion. Aim to cut through skin, tendons, and any connective tissue right down to the bone. You want a clean separation between the meat and the exposed bone.
- Clean the Bone: With the cut made, use the back of your knife or your fingers to scrape and push all the meat, skin, and tendons downwards towards the thicker end of the drumstick. Remove any small bits of cartilage or stray meat pieces from the now exposed bone. The goal is a clean, white bone that acts as the "stick" of your lollipop.
- Form the Lollipop: Continue pushing the meat down, gathering it into a compact, ball-like shape at the wider end of the bone. This creates the classic chicken lollipop appearance.
- Repeat and Store Scraps: Repeat this process for all your drumsticks. Don't discard the trimmed skin, small meat pieces, or bone fragments! These can be frozen and later used to make rich, flavorful chicken stock or broth, reducing waste and maximizing flavor. This is an excellent way to use every part of the chicken, embodying a low-waste cooking philosophy.
Mastering this technique is key to creating visually stunning Mastering Chicken Lollipops: From Drumstick Shaping to Tender Perfection, ensuring your guests are impressed even before the first bite.
Crafting the Flavor Profile: Marinades and Seasonings
The flavor of your chicken lollipops is only limited by your imagination. While a simple salt and pepper seasoning works wonders, a well-crafted marinade or spice rub can elevate them to gourmet status. The advantage of baking is that it allows these flavors to truly shine without being masked by heavy oil.
Essential Ingredients for a Classic Marinade:
- Chicken Drumsticks: Opt for meaty ones – they hold flavor better and stay juicier. While drumsticks are easiest, you can also adapt this recipe for chicken wings.
- Olive Oil: Acts as a binder for seasonings and helps tenderize the chicken.
- Lemon Juice: Adds brightness and helps tenderize the meat.
- Seasonings: A foundational blend includes:
- Paprika: For a sweet, smoky depth and beautiful color.
- Garlic Powder & Onion Powder: Essential aromatics that permeate the meat.
- Salt & Black Pepper: The backbone of any good seasoning.
- BBQ Sauce (Optional, but Recommended): For the final glaze, whether store-bought (choose a low-sugar option for a healthier twist) or homemade.
Experiment with Flavor:
Don't be afraid to customize! Consider adding:
- Herbs: Dried oregano, thyme, rosemary, or fresh parsley can add aromatic complexity.
- Spices: Cumin, coriander, chili powder for a touch of warmth, or a pinch of cayenne for heat.
- Asian Twist: Soy sauce, ginger, sesame oil, and a touch of honey or maple syrup.
- Mediterranean Vibe: Oregano, lemon zest, garlic, and a hint of sumac.
Marinating for Depth: While you can cook your seasoned chicken lollipops immediately, allowing them to marinate for a few hours (or even overnight) in the fridge will result in a deeper, more infused flavor and extra tenderness. The acidity from the lemon juice and the enzymes in the marinade subtly break down muscle fibers, ensuring a succulent result.
Baking to Perfection: The Healthier Cooking Method
Baking is the star of this healthier chicken lollipop recipe. It eliminates the need for excessive oil, creating a wonderfully tender interior and a deliciously crispy skin. Plus, it’s mostly hands-off, freeing you up to prepare other elements of your meal or party spread.
Baking Instructions:
- Preheat Your Oven: Get your oven roaring to 400°F (200°C). Proper preheating is crucial for achieving that initial sear and locking in juices.
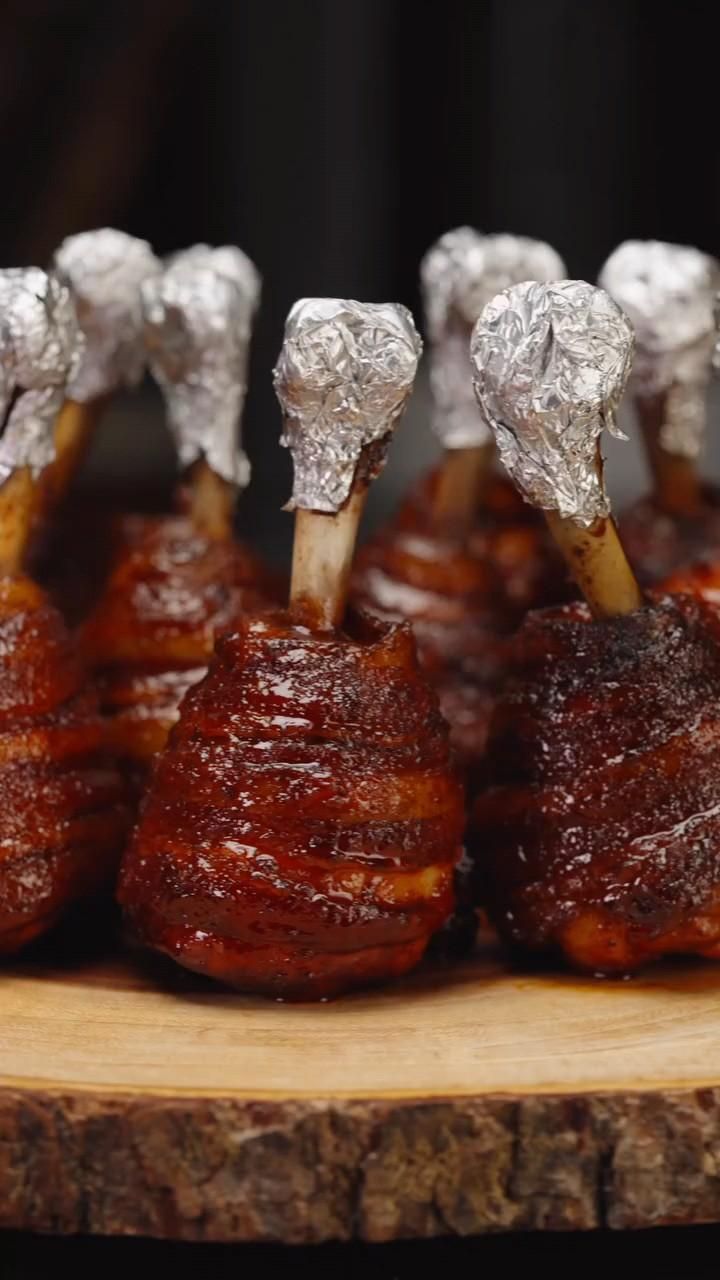
- Prepare for Baking: Cover the exposed bone tips of your lollipops with small pieces of aluminum foil. This prevents them from burning and keeps them clean. Arrange the lollipops upright on a baking tray. You can use a roasting rack set within a baking sheet for even better air circulation, which promotes crispier skin.
- Initial Bake: Bake for approximately 25-30 minutes. At this stage, the chicken should be mostly cooked through, and the skin will begin to render and turn golden.
- Check Doneness: The internal temperature of dark meat chicken should reach 175°F (79°C) for optimal juiciness and tenderness. Use a reliable meat thermometer inserted into the thickest part of the meat, avoiding the bone.
- Broil with Sauce for Glaze (Optional, but Recommended): For that irresistible, caramelized exterior, remove the foil from the bone tips. Brush your chicken lollipops generously with your favorite BBQ sauce (or a homemade glaze). Return them to the oven and broil on high for 5-10 minutes, or until the sauce is bubbly, slightly charred, and beautifully glazed. Watch carefully to prevent burning! This step gives them that "party food" appeal and adds an extra layer of flavor and texture, transforming them into Perfect Baked Chicken Lollipops: Crispy, Juicy & Easy Party Food.
- Rest Before Serving: Once baked and glazed, let the chicken lollipops rest for 5-10 minutes before serving. This allows the juices to redistribute, ensuring every bite is moist and flavorful.
Tips for Crispy Skin:
- Pat Dry: Before seasoning, pat the chicken drumsticks thoroughly dry with paper towels. Moisture is the enemy of crispy skin.
- Baking Rack: As mentioned, baking on a wire rack allows hot air to circulate all around the chicken, rendering the fat and crisping the skin more effectively.
- Don't Overcrowd: Give your lollipops space on the baking tray. Overcrowding can steam the chicken instead of roasting it, leading to less crispy skin.
Serving Suggestions & Customization
These healthier chicken lollipops are incredibly versatile. Serve them as an elegant appetizer at your next party, a fun snack for game night, or alongside some healthy sides for a complete meal.
Pairing Ideas:
- Dipping Sauces: Offer a variety! Beyond classic BBQ, consider honey mustard, ranch, a spicy sriracha mayo, or a vibrant chimichurri.
- Side Dishes: Pair with a crisp green salad, roasted vegetables (like asparagus or broccoli), a light quinoa salad, or baked sweet potato fries for a balanced meal.
- Garnishes: A sprinkle of fresh chopped parsley, cilantro, or sesame seeds can add a pop of color and extra flavor.
Make Ahead & Storage:
You can French and marinate the chicken a day in advance, storing them in an airtight container in the refrigerator. Leftovers can be stored in the fridge for up to 3-4 days. Reheat gently in the oven or air fryer to maintain crispiness.
Conclusion
Making healthier, flavorful chicken lollipops at home is a rewarding experience that proves you don't have to compromise on taste for health. By baking instead of frying, you get wonderfully juicy, tender chicken with a satisfyingly crispy skin, all infused with your chosen seasonings and glazes. From the satisfying act of Frenching to the final glazed perfection, this recipe is a journey in culinary delight. So go ahead, impress your family and friends with these irresistible baked chicken lollipops – they're sure to be a hit!
